
 Pin it
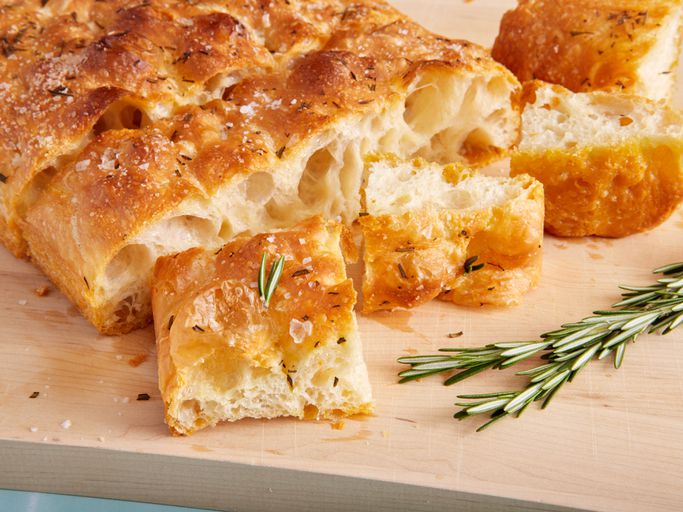
This no-knead focaccia is a revelation in bread making. The dough uses an exceptionally high water content—higher than any other bread recipe I've worked with—which creates those gorgeous, airy bubbles everyone loves. What makes this bread truly special is the long fermentation process, developing a depth of flavor that simply can't be rushed. The result is a beautifully textured bread with a crisp exterior and soft, pillowy interior that's worlds apart from quick-rise versions.
I've made this focaccia countless times, and my family now expects it whenever we have Italian night. Last Christmas, I brought two pans to our family gathering, and they disappeared before the main course was even served!
Ingredients
- 4 cups plus 2 tablespoons bread flour - Essential for creating the necessary gluten structure that supports those beautiful air bubbles. Look for a high-protein bread flour (12-14% protein) for best results.
- ¼ teaspoon active dry yeast - Just a tiny amount is needed since the long fermentation time lets this small quantity do tremendous work. Make sure it's fresh and not expired.
- 2 teaspoons kosher salt - Provides flavor throughout the dough. Diamond Crystal kosher salt is ideal, but any kosher salt works well.
- 4 teaspoons extra-virgin olive oil (plus more for handling) - Use a good quality olive oil as it contributes significantly to the flavor. A fruity, medium-intensity oil works beautifully.
- 1⅔ cups room temperature water - Temperature matters here; too cold and fermentation slows down, too warm and it goes too quickly.
- 1 tablespoon fresh rosemary - Fresh herbs make all the difference. Look for vibrant, aromatic sprigs and mince them just before using.
- 1 tablespoon flaky sea salt - Maldon or another flaky finishing salt provides texture and bursts of saltiness on top. Worth seeking out for this recipe.
Preparation Steps
- 1. Initial Mixing
- Combine the bread flour and yeast in a large bowl, mixing thoroughly to distribute the yeast evenly. Add the kosher salt, followed by the olive oil and room temperature water. Stir with a wooden spoon until you have a wet, sticky dough with no dry flour remaining. The dough will look shaggy and much wetter than traditional bread dough—this is exactly what you want for those beautiful air pockets to form.
- 2. First Fermentation
- Cover the bowl with plastic wrap or a damp kitchen towel and let it sit at room temperature (around 70°F is ideal) for 12-14 hours. This long, slow fermentation is where the magic happens—developing flavor compounds and beginning the gluten structure. The dough will have doubled in size and be covered with bubbles when ready.
- 3. First Folding
- Prepare a work surface by drizzling it generously with olive oil. Using oiled hands, gently transfer the dough onto the oiled surface. With fingertips still oiled, press and stretch the dough into a 16x12 inch rectangle. Be gentle to preserve the air bubbles that have formed. Fold the dough in thirds horizontally like a letter, then fold vertically into thirds to create a compact package. Transfer this folded dough, smooth side up, into a generously oiled pan.
- 4. First Rest
- Cover the pan tightly with plastic wrap and let the dough rest until it has nearly doubled in size, about 1 hour. The dough will become noticeably puffier and more relaxed.
- 5. Second Folding
- With oiled hands again, repeat the folding process—folding the dough into thirds horizontally, then into thirds vertically. This folding develops the gluten structure without traditional kneading. Flip the dough so the smooth side faces up, cover with plastic wrap, and let rest for another hour.
- 6. Final Folding and Shaping
- Unwrap and perform one more series of stretches and folds in each direction, again using oiled hands. Transfer the dough, smooth-side up, into a generously oiled metal baking pan (12x8 inches works well). Drizzle the top lightly with additional olive oil and gently stretch it to fit the shape of the pan. Cover and let rest for 2 hours.
- 7. Preparing for Baking
- Preheat your oven to 425°F (220°C) with a rack positioned in the center. Once the dough has completed its final rest, uncover it and use oiled fingertips to create the characteristic dimples across the surface, pressing down firmly but not all the way through the dough. Evenly scatter the minced rosemary and flaky sea salt over the top.
- 8. Baking
- Slide the pan into the preheated oven and bake until deeply golden brown, about 30 minutes. The bread should sound hollow when tapped on the bottom. Allow it to cool in the pan for 10 minutes before transferring to a wire rack to cool completely, about 30 minutes more. This cooling period is crucial for the texture to set properly.
My son, who normally avoids carbs, makes an exception for this focaccia. He claims the rosemary reminds him of our trip to Tuscany, where we watched an elderly woman make focaccia in a wood-fired oven outside her countryside home. That memory alone makes this recipe special in our family.
Working With High-Hydration Dough
Working with high-hydration dough might seem intimidating at first, but it's actually quite forgiving. The key is to use plenty of olive oil—on your hands, on your work surface, and in the pan. Unlike traditional bread dough that you might fight to shape, this wet dough wants to be guided rather than forced. Think of it as coaxing rather than controlling. I've found that dipping my fingertips in olive oil before each handling prevents sticking and makes the entire process much more enjoyable. The results are worth the slight learning curve, producing bread with an artisanal quality that's impossible to achieve with drier doughs.
Variations Worth Trying
The beauty of focaccia lies in its versatility as a canvas for flavors. While the classic rosemary version holds a special place in my kitchen, countless variations have graced my table over the years. Try topping with thinly sliced cherry tomatoes, caramelized onions, or olives before baking. For a sweet twist, omit the rosemary and salt topping and instead press fresh grapes into the dough with a sprinkle of sugar and anise seeds—a variation called "schiacciata con l'uva" in Tuscany. My personal favorite variation includes thinly sliced potatoes, caramelized onions, and a sprinkle of grated Parmesan added 10 minutes before the end of baking. The options are endless and provide a wonderful opportunity to showcase seasonal ingredients.
Serving and Storage Suggestions
Focaccia shines brightest when served shortly after baking, while the contrast between crisp exterior and soft interior is most pronounced. Serve it as part of an antipasto platter with good olive oil, aged balsamic vinegar, and marinated vegetables. It makes an exceptional sandwich bread—try splitting it horizontally and filling with layers of Italian cold cuts, provolone, and arugula for a memorable lunch. Leftover focaccia can be wrapped tightly and stored at room temperature for up to three days. To refresh it, sprinkle with a few drops of water and heat in a 350°F oven for 5-7 minutes. For longer storage, slice the focaccia, wrap portions in plastic wrap, then foil, and freeze for up to a month. Thaw at room temperature and toast lightly before serving.
Frequently Asked Questions
- → Why does this focaccia dough need such a long fermentation time?
The extended 12-14 hour fermentation allows yeast to work slowly, developing complex flavors while natural enzymes break down starches into sugars. This creates the signature depth of flavor impossible to achieve with quick-rise methods.
- → Can I use all-purpose flour instead of bread flour?
Yes, but bread flour is strongly recommended for high-hydration dough. All-purpose flour contains less protein/gluten, making the wet dough significantly harder to stretch and shape while reducing structural integrity.
- → Why is this considered a 'high-hydration' dough?
This dough uses 400g water to 500g flour (80% hydration), which is significantly wetter than standard bread doughs. This high water content creates the signature large bubbles and soft interior texture of authentic focaccia.
- → What if I don't have a scale for measuring ingredients?
While volume measurements are provided, a digital scale is highly recommended for accuracy. The high water content makes precision crucial - even small measurement errors can significantly impact the dough's consistency and results.
- → Can I add different toppings besides rosemary?
Absolutely! While rosemary is traditional, focaccia works beautifully with various toppings. Try cherry tomatoes, olives, caramelized onions, roasted garlic, thinly sliced potatoes, or different herbs like thyme or sage.
- → How should I store leftover focaccia?
Store completely cooled focaccia in an airtight container at room temperature for 2-3 days. For longer storage, slice and freeze in freezer bags for up to 3 months. Reheat frozen slices directly in a toaster or 350°F oven until warmed through.