
 Pin it
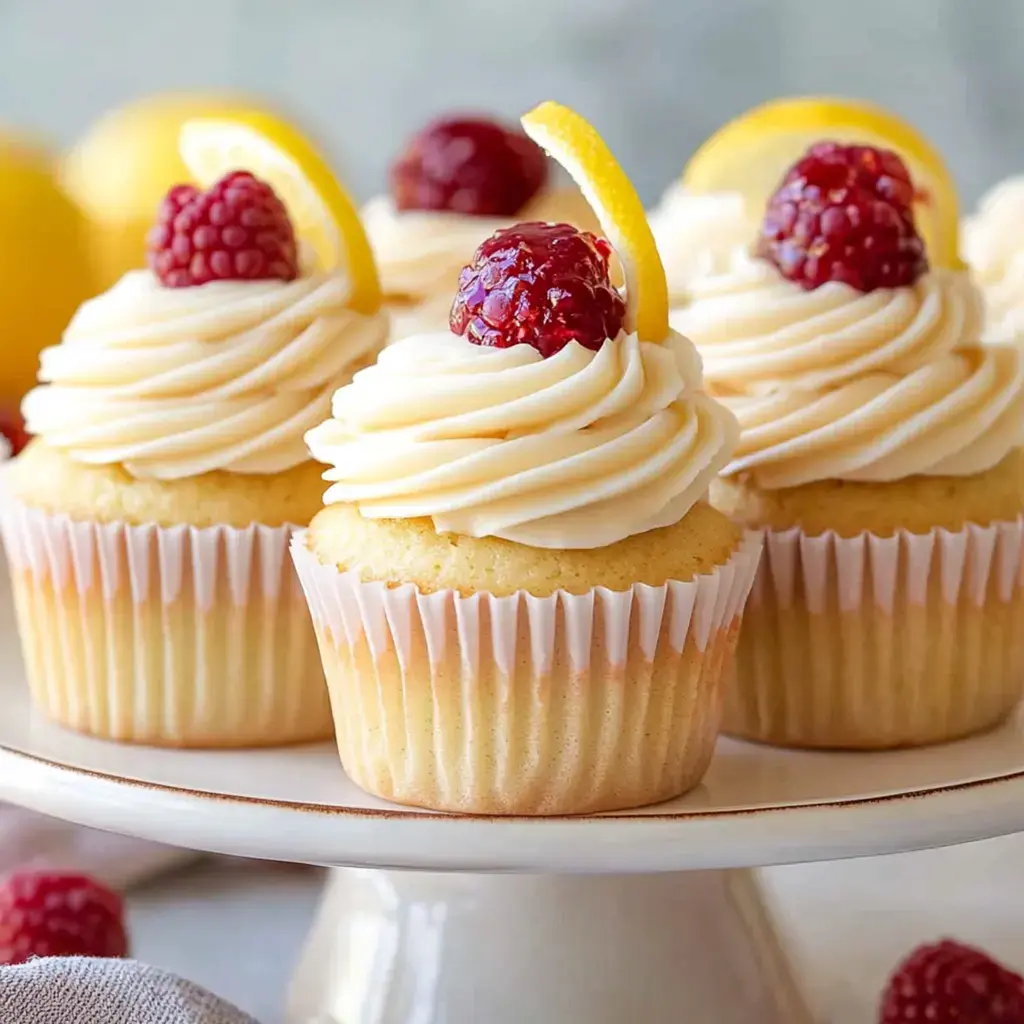
These Citrusy Raspberry Cupcakes mix tangy lemon sponge, fruity raspberry centers, and smooth berry frosting. Made in just 90 minutes, they work great for gatherings, outdoor events, or just snacking on the weekend. Every mouthful gives you that perfect mix of citrus and berry flavors wrapped in a soft, juicy cake crowned with velvety topping.
Ideal For Every Celebration
Anyone with simple baking knowledge can whip these up using stuff you probably already have. They'll stay good for 3 days when left out or pop them in the freezer for up to 2 months. You'll get 12 regular-sized cupcakes, and you can simply make twice as many if you need more. They're great to prepare beforehand - you can fill and top them a full day before you plan to serve.
Key Ingredients Needed
- All-Purpose Flour: 1½ cups (180g), run through a sifter for best results
- Baking Powder: 1½ teaspoons (7g), check that it's not expired
- Salt: ¼ teaspoon (1.5g) fine sea salt
- Unsalted Butter: ½ cup (113g), left out until 65°F/18°C
- Granulated Sugar: 1 cup (200g), regular white kind
- Lemon Zest: 2 tablespoons (12g) grated from 2 lemons
- Large Eggs: 2 (100g), warmed to 65°F/18°C
- Pure Vanilla Extract: 1 teaspoon (5ml), genuine stuff works best
- Whole Milk: ½ cup (120ml) not cold from fridge
- Fresh Lemon Juice: 2 tablespoons (30ml) without seeds
- Raspberry Preserves: ½ cup (160g) nice and thick
- Buttercream Ingredients: 1 cup (227g) butter, 4 cups (480g) powdered sugar, ¼ cup (80g) raspberry preserves, 2 tablespoons (30ml) milk, ½ teaspoon vanilla, pinch salt
Step-by-Step Baking Guide
- Get Your Stuff Ready (5 minutes)
- Turn oven on to 350°F (175°C). Put paper cups in your 12-hole muffin tin. Make sure everything's at room temp and grab your kitchen scale.
- Combine Starting Items (10 minutes)
- Sift your flour, baking powder, and salt together in a bowl. Using your mixer, beat butter, sugar, and lemon zest on medium (number 6) for 3 minutes until it looks light. Remember to scrape the bowl twice.
- Finish Your Batter (8 minutes)
- Put in eggs one by one, beating half a minute each time. Add vanilla. Then go back and forth with dry stuff and milk mixture three times, mixing for 15 seconds between. Stop when it's just mixed together. Don't go overboard!
- Cook and Let Cool (30 minutes)
- Fill each paper cup about 2/3 full (around 60g per cup). Cook for 18-20 minutes until you can stick a toothpick in and it comes out clean and they hit 205°F (96°C) inside. Let them sit 5 minutes in the tin, then move to a rack.
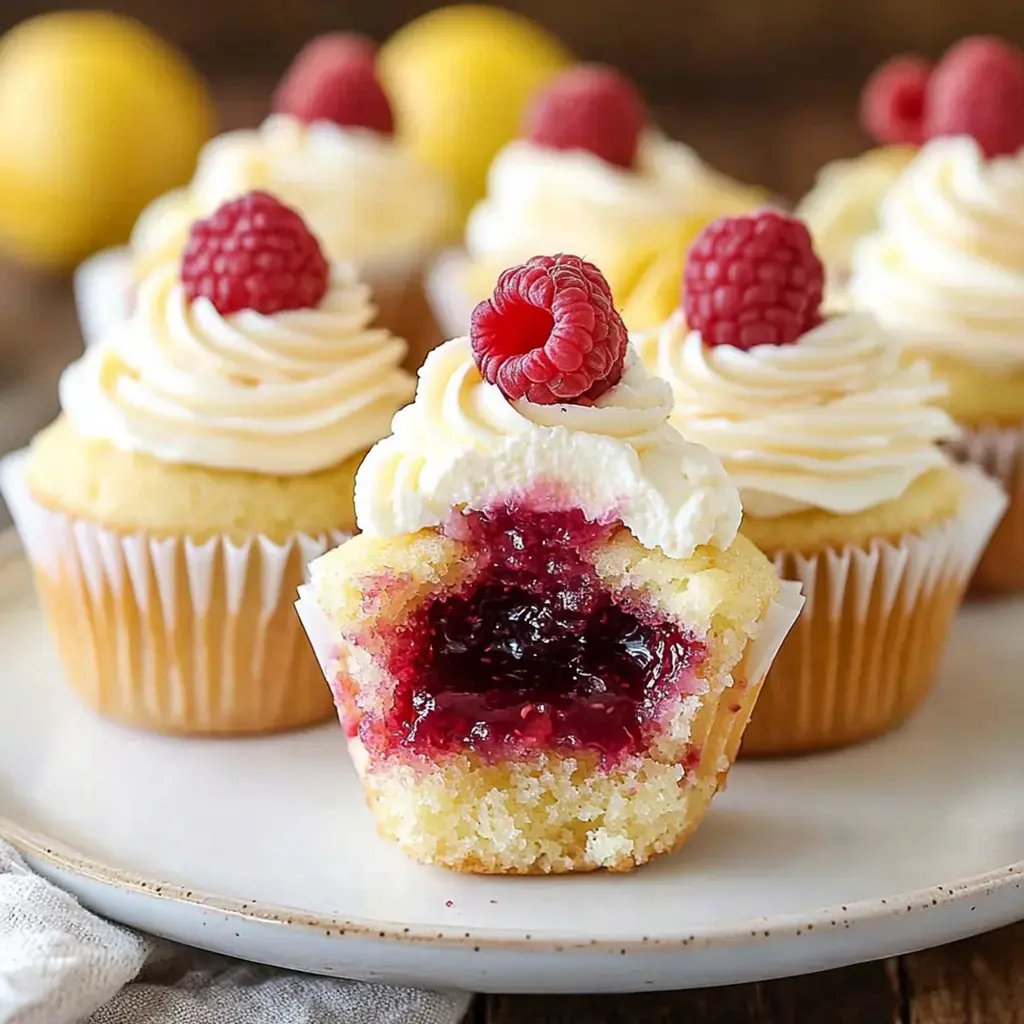
- Add Filling (15 minutes)
- After they're totally cool, cut out middles about 1-inch deep and ¾-inch across. Put about 1½ teaspoons (7g) of raspberry jam in each hole. Cut the tops smaller and put them back on.
- Whip Up Frosting (15 minutes)
- Beat your room temp butter (65°F/18°C) for 5 minutes till super light. Add powdered sugar in three batches. Mix in jam, milk, vanilla, and salt. Beat on high (number 8) for 3 minutes till fluffy.
- Add Final Touches (20 minutes)
- Put frosting in a piping bag with 1M tip. Make swirls on each cupcake, working from outside toward middle. Top with a fresh raspberry and lemon zest if you want. Cool in fridge 20 minutes to firm up.
Keeping Them Fresh
Plain cupcakes last a day at room temp in a sealed container. Ones with frosting should go in the fridge for up to 3 days. Let them warm up for half an hour before eating. You can freeze unfrosted cupcakes for up to 2 months if you wrap each one in plastic and then put them all in a freezer bag. Thaw in the fridge overnight.
Signs Everything's Going Right
Your batter needs to be smooth but not overmixed. Cupcakes should bounce back when you touch them and reach 205°F (96°C) inside. The jam can't be runny or it'll make the cake soggy. Watch your buttercream temp carefully - too hot and it'll fall apart, too cold and you can't pipe it smoothly. Always check if anything's expired before you start.
Tools You'll Need
You really need a stand mixer with both paddle and whisk parts for the right texture. A normal 12-cup muffin tin with 2½-inch wide cups works best. Don't skip the digital scale for getting amounts right. Grab a candy thermometer for checking temps. You'll want a big (16-inch) piping bag with that Wilton 1M star tip. A digital quick-read thermometer tells you when they're done.
Fixing Common Problems
Heavy cupcakes mean you mixed too hard - just gently fold dry stuff in. If middles sink, you peeked too early - wait till minute 15 to check. Lumpy batter happens when stuff's too cold - everything should be room temp. If frosting separates, beat it high for 5 minutes. Leaky centers mean you used too much jam - stick with 1½ teaspoons in each.
Different Ways To Make Them
Try swapping in blueberry jam and lime zest for a different flavor combo. Orange zest and marmalade make a nice change too. For folks who can't do dairy, plant butters and milks work fine. Toss in 1 teaspoon of cooking lavender for a fancy twist. Cut sugar to ¾ cup if you don't like things too sweet. You can cook all these versions the same way for the same time.
Staying Safe While Baking
Make sure they hit 205°F (96°C) inside for food safety. Throw them out if they sit out more than a day. Keep jam in the fridge under 40°F (4°C) between uses. Clean all your tools first. Use safe eggs if serving people with health concerns. Don't eat the raw mix. Double-check nothing's expired.
 Pin it
Frequently Asked Questions
- → Can I switch up the jam?
Sure! Any berry jam works fine as long as it's thick. Homemade ones are even better, but steer clear of super runny ones.
- → How should I store them?
Because of the cream, keep 'em in the fridge. Store in a secure box and eat within a few days. Let 'em sit out a bit before eating for the best flavor.
- → Can I make them the day before?
Absolutely. Just bake and fill, but frost them the day you serve. Either keep at room temp covered or in the fridge if it's warm out.
- → How do I fill them neatly?
Use a little knife to cut shallow holes. Spoon in a bit of jam. Don’t overfill to avoid mess. Simple but worth it.
- → Can I freeze these?
Yes, you can freeze the plain cupcakes without the jam or frosting. Wrap them tightly, thaw, and add the filling and frosting later. Best enjoyed fresh after thawing!
- → What if they taste too sweet?
Reduce the sugar in the batter and pick a tart jam. You can also skip some of the filling if it's too much for your taste!
- → How do I transport them safely?
Put them in a sturdy box and keep the layers low. Keep 'em chilled if possible. Fresh frosting holds better. Pack with care!
- → How do I speed things up?
Use a quick mix method and have your ingredients ready. Skip fancy frosting details if needed. Still comes out delicious!
- → What if I want to make more?
Doubling the recipe is no problem! Just make sure you’ve got extra pans and oven space handy. Work in batches if needed.
- → How do I add more flavor?
Grate in more lemon zest or even mix in fresh fruit chunks. You could try different berry jams or a dash of spice, but keep that fruity vibe front and center.
- → Why don't my tops look nice?
Practice piping on parchment first. Use a large piping tip and make sure your frosting is soft but not runny. Work quickly, and don’t stress—it gets easier!
- → What if the cakes turn out dry?
Make sure you check the bake time early, and don’t overbake. Adding more jam filling can also help. Store them well to keep moist.
Conclusion
If you like these, try making some fruity scones or experiment with a berry tart. Both offer a similar sweet and tangy flavor mix you'll love.