 Pin it
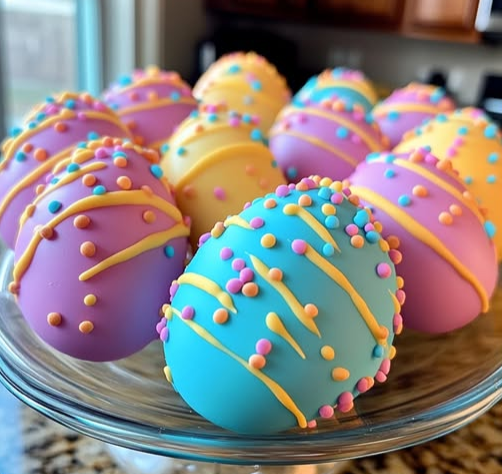
This cookie dough truffle recipe transforms your favorite Easter flavors into bite-sized treats that look as festive as they taste. Shaped like miniature eggs and coated in pastel candy melts, they deliver all the joy of raw cookie dough without any of the worry.
I first made these truffles for my daughter's spring birthday party and they disappeared faster than any other dessert. The kids thought they were magical and the adults couldn't believe they weren't from a specialty shop.
Ingredients
- Butter: Room temperature provides that rich cookie dough base essential for authentic taste
- Brown sugar: Creates depth of flavor and that classic cookie dough sweetness
- All purpose flour: Provides structure after heat treating ensures safety
- Vanilla extract: Adds warmth and that homemade cookie aroma
- Sweetened condensed milk: Creates the perfect consistency and adds creaminess
- Mini chocolate chips: Distribute evenly throughout the dough for chocolate in every bite
- Candy melts: In festive colors create the beautiful Easter egg appearance and seal in freshness
Step-by-Step Instructions
- Cream the butter and sugar:
- Beat room temperature butter with brown sugar for a full two minutes until it becomes notably lighter in color and fluffy in texture. This incorporates air making the truffles tender rather than dense. The mixture should look almost whipped before moving forward.
- Add vanilla and flour:
- Incorporate vanilla extract completely then gradually add the heat treated flour. The mixture will look crumbly at first but continue mixing until it begins to come together. Take your time with this step to prevent flour pockets in your finished truffles.
- Incorporate sweetened condensed milk:
- With mixer running on low speed slowly stream in the sweetened condensed milk. Stop periodically to scrape down the sides of the bowl ensuring even incorporation. Pour directly from the can rather than using a spatula to scrape it out which prevents introducing metal shavings from the can edge.
- Mix in chocolate chips:
- Stir mini chocolate chips into the dough just until distributed evenly. Avoid overmixing at this stage which can cause the chips to break down and streak the dough.
- Shape into eggs:
- Form approximately one inch balls of dough using a cookie scoop for consistency then shape each into an egg form by gently pinching one end. Place shaped eggs on a wax paper lined sheet and refrigerate overnight to firm completely.
- Dip in candy coating:
- Working with just a few truffles at a time to keep them cold dip each egg into melted candy coating. Carefully lift with a fork allowing excess to drip off then transfer to wax paper to set. Return undipped truffles to refrigerator between batches.
The mini chocolate chips make all the difference in these truffles. I once tried making them with regular sized chips and the texture was completely different. The mini size distributes perfectly throughout each bite creating that authentic cookie dough experience that makes everyone smile with nostalgia.
Storage Success
These cookie dough truffles need to be stored in the refrigerator in an airtight container where they will stay fresh for up to two weeks. The candy coating creates a protective seal around the dough preventing it from drying out. For best texture allow them to sit at room temperature for about 5 minutes before serving. If you need to make them further in advance they can be frozen for up to 3 months just thaw in the refrigerator overnight before serving.
Colorful Creativity
While the recipe suggests pink blue purple and white candy melts you can customize these truffles for any occasion. Try red and green for Christmas orange and black for Halloween or school colors for graduation parties. You can even drizzle contrasting colors across the base coat for a more elaborate design. Food coloring pens designed for decorating candy can add personalized details like flowers dots or stripes to make each truffle unique.
Gifting Guide
These truffles make wonderful homemade gifts during the Easter season. Place them in small paper candy cups and arrange in a decorative tin or Easter basket lined with colorful tissue paper. Add a personalized tag with storage instructions. For maximum freshness gift them within 3 days of making. Consider including the recipe card so your recipients can make their own batch when they inevitably crave more.
Frequently Asked Questions
- → How do I safely use raw flour in this recipe?
To prevent any risk of e. coli, spread the flour on a baking sheet and bake it at 350°F for 5 minutes. Allow it to cool before using in the dough.
- → Can I use different types of chocolate for the coating?
Yes! While candy melts work best for a smooth, colorful coating, you can substitute melted chocolate chips or baking chocolate if desired.
- → How do I achieve the right butter consistency?
The butter should be room temperature—soft yet firm enough that your finger can press into it but not all the way through. To soften quickly, cut the butter into smaller pieces and leave it at room temperature for about 30 minutes.
- → Why should I refrigerate the truffles before dipping?
Keeping the dough chilled ensures it holds its shape while dipping in the melted candy coating. It also helps the coating set quickly and evenly.
- → How can I properly melt candy melts for dipping?
Follow the instructions on the candy melts packaging. Usually, microwaving in short intervals (15-30 seconds) with stirring in between helps achieve a smooth consistency without overheating.
